I hope everyone liked the muffin recipe! You know what is great on Red Currant Muffins? Red Currant Jelly!
Well, more like: what else do you do with four more full, ripe bushes of red currants? You make jelly!
I really wanted to find a recipe without pectin. I have some research to do on the pectin front. But when I saw the pectin in the store it didn’t say much in the ingredients other then some chemical names I didn’t understand and the final ingredient was just “preservatives”. It made me a bit uneasy. So I found this recipe for Pectin Free Jelly and followed along using these two other sites (called: Canning 101 and Water Bath Canning) helpful for first time canners. I guess the method I used was water bath canning. The directions were a tad bit confusing but I’ll let you know what I did, with help from my friend Heather. I’ve never canned before and the canning equipment I have consists of:
Canning Jar Funnel
8oz Jelly Jars
Cheesecloth
You Will Need:
Strainer
Large, Deep Saucepan
Medium Saucepan
Steaming Basket
Sugar
(oh and remember an apron, and maybe a don’t wear white)
Before you start, wash three jars with soap and water. Fill a large, deep sauce pan with hot water and the three jars (sans bands and lid), filled with the hot water. Put it on low.
Step 1:
Harvest the Red Currant Berries
- AKA: sweat your butt off and slightly pull a muscle in your lower back as you start off carefully pulling off each and every stem full of berries and then progress to frantically stripping the berries and stems and probably missing a few and forgetting what it feels like to not be covered in sweat.
- You must have at least 2 pounds of berries.
Step 2:
Pick out Stems, Leaves and Clean Berries
- AKA: Spend an ridiculously long amount of time to sort through all the berries only to find out you probably didn’t need to take the stems out, I found several different recipes saying you can either take the stems out or leave them in. I took them out. Let me know what you’ve been told.
Step 3:
Add 2 Cups of Water to the 2 Pounds of Berries and Simmer for 40 Minutes
- Simmer the berries and squish them with a potato masher or spoon. The goal is for them to be soft and mushy.
Step 4:
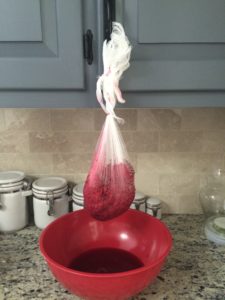
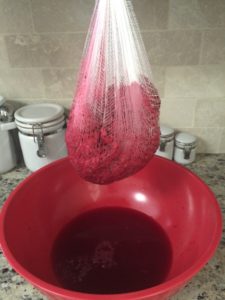
Pour the Mixture into a Cheesecloth and Hang Over Night to Strain the Juice Out
- I draped the cheesecloth over a bowl and slowly poured it into the bowl then gathered the sides and tied the top off with a rubber band. Then tied it to a cabinet handle. It looks silly but useful.
Step 5:
Boil Juice and Add 1 Pound of Sugar for Every Pint of Juice
- AKA: be utterly appalled by the measly amount of juice you’ve created. Then, be utterly appalled by the amount of sugar you’re suppose to add. The recipe I found said the whole 1 pint for 1 pound of sugar thing. I’m hoping in the future I’ll find one that has less.
- Boil the juice for 15 minutes (the recipe says 10-20, which is honestly such a large gap so I split the difference) Then add the sugar, stir until dissolved.
Step 6:
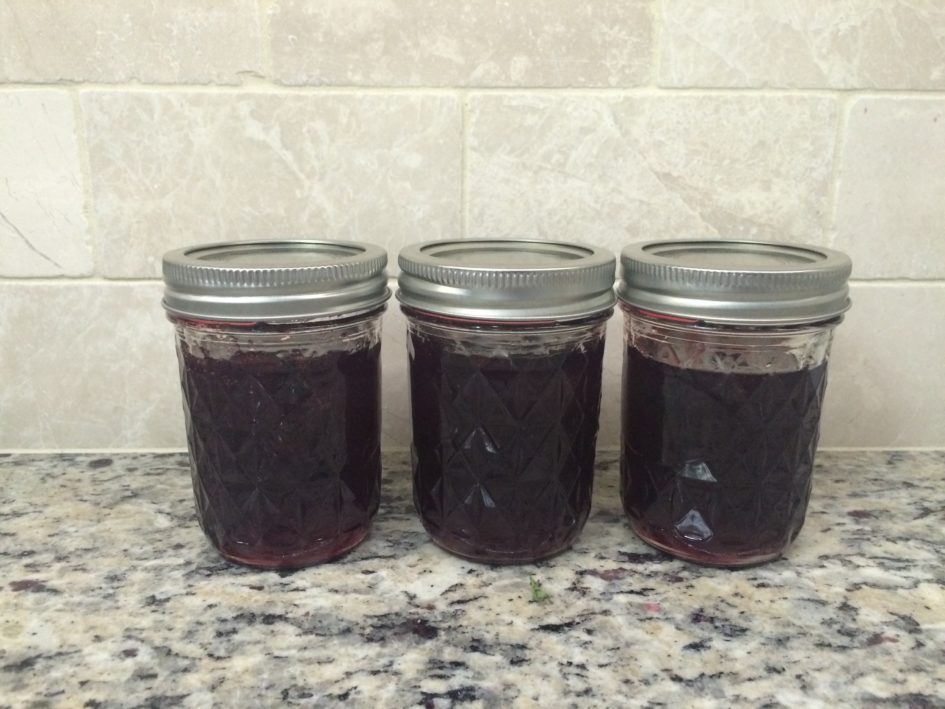
Using a Wide Mouth Funnel Fill the Jars Leaving 1/4 inch Space from the Top
Step 7:
Water Bath Canning Procedure
- AKA: Put a steaming basket in the bottom of the saucepan then put the jars in upside down. Fill it with hot water until the water is fully covered the jars. Boil it at a rolling boil for 10 minutes. Turn the water off and let them sit for five minutes in the water.
- Using tongs and an oven mitt, or towel or whatever will protect your hand (even better, the jar tongs that are used for canning) to remove the jars and set them upright on a towel. Leave them out overnight and don’t forget to label them!

Enjoy!
Share Now!