We’ll look back on the first weekend of April and remember the kindness of our friend Elise who helped us, the feeling of accomplishment, the raising of a new structure and the absolutely bitter wind that permeated every single layer of clothing we wore that day. As you’ve seen the coop is already up and holding chickens, but we want to share how to build one on your own.
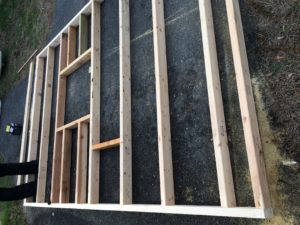
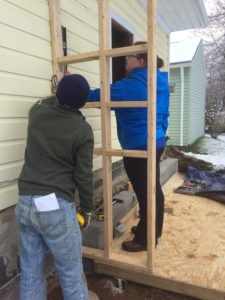
It was the epitome of a New England Spring day and made us wonder why the hell we had chosen this weekend to build the coop. The first building day we built the floor (chronicled in this post here) and started on the largest wall, a ten foot by 6 foot wall with one window in. We framed the wall, window, cut the sheathing from plywood and secured it to the frame.
It sounds so easy when we just list what we did, but for two people who have never built anything before. While battling fiercely cold winds, occasional hail storms and basking in the short spots of sun we gathered around the frame, blocking the wind with our bodies and took turns hammering home the nails of each stud, tagging each other in when our arms were tired.
Our heaviest, largest wall complete the first day we had to stash it inside during a surprise hail storm and headed in for warm cups of tea and some hot soup, ready to start again the next morning.
Wall Framing
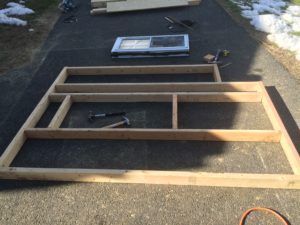
We started framing the long wall first. The coop is built to come off the garage by 5′ and be 10′ long. We got 10′ 2×4’s to act as the top and bottom plate, and cut the studs to size inside. We located the window midway through the wall and adjusted the stud spacing accordingly.
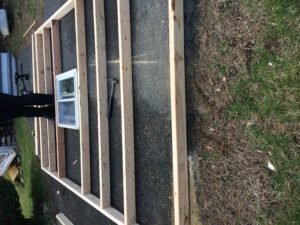
Once we had the window sized, we framed the whole wall, leaving a space for the window, and an area to place our chicken door to access the run.
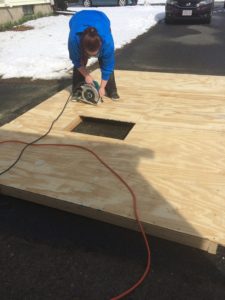
On the long wall we added the 3/8″ plywood sheathing while on the ground. Due to wind we didn’t raise it for a few days. (Jenny and I installed the wall ourselves, quite a feat to install a 6’x10′ stud wall fully sheathed). Yes we built this in the snow, and mid 30 degree weather.
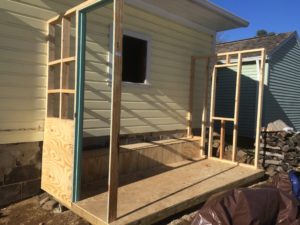
The small outside walls we framed the same way. However since we were unsure of the exact dimensions needed for the sheathing to connect to the garage, we decided to raise the walls prior to the sheathing.
We were (mostly) sure to level and square our walls when installed. We only had to take 1 or 2 of them out because we forgot to make them level. The final product is pretty good. Glad we have the garage to anchor to though.
At the end of the first weekend we were able to have the floor installed, the 2 end walls installed, and the 10′ wall fully built and sheathed waiting in the garage for installation. The second weekend we got to the roof installation.
Roof Install
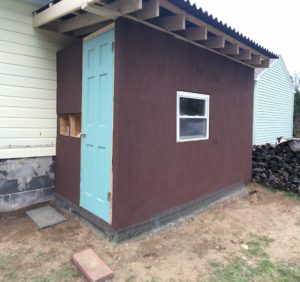
We did not have a trust photographer for the final wall installations, so we can brag about how impressive it was to lift the wall into place. Once we got the walls up, we painted the first coat so we could dig down 1′ and bury 1/2″ mesh wire in the ground to prevent animals from living underneath the coop.
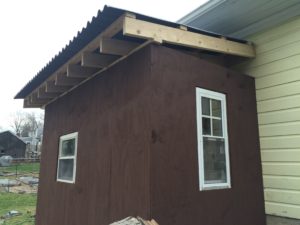
The third full day of work was the roof joists and roofing. We cut 2×6 at slight angles and notched them into the top plate. The 2×6 ran off the garage, and we installed perlins perpendicular to the joists to hold the roofing in place.
From the inside view you can see the joists sloping away from the garage wall secured only to the garage. So far we have left all the studs exposed and will certainly be fine all summer without any insulation.
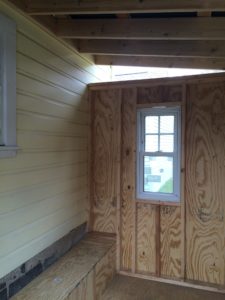
From here you can best see the joists and perlins spacing. The last step was to install the roofing. We went with Ondura roofing, which is an asphalt roof self supporting. We went with this for a few reasons; we didn’t want to build a fully supported roof so wanted a material that could withstand the weight, and we went with the Ondura over metal because of the dimensions we could buy it. We got 3 panels each 4’x6′ fit perfectly together to cover the coop and provide overhangs.
The last steps were to close up all the gaps, adding wire mesh to any openings larger than 1″ and adding trim and blocking to larger gaps we wanted to close up for good. Once we get the run installed we’ll post again about the completed coop, and we’ll total up how much it cost.
Share Now!